

Learning programming languages used to be difficult. But today, there are lots of ways to learn different programming languages, thanks to online courses. It has become an accessible skill to learn and master. In fact, you may even be required to have some knowledge of programming languages for your job. Some of the most popular programming languages used today include Python. There are others such as Java, Ruby, and SQL. But did you know that you can use programming languages to find your word count?
Though you can easily hit the word count tool in whichever word processor you are using, it’s always good to know, how to find your word count using programming languages. This is especially if you’re learning how to program. But which method is easier? So let’s find out!
What’s the Importance of Word Count?
Word count is important when you are writing an article or any written content that requires a specific length. A word counter will help you not to exceed the maximum length or be short of the minimum length required for your writing. It will also help you in optimizing the lengths of your paragraphs and sentences so that they don’t become too wordy. Most tools like this also give you the character count of your work when you check your word count. This is important when you are writing things like meta description or any other writeups that have character count limitations.
In programming, a word counter or character counter helps when you want to show how many words there are in a string, a column, or a row.
How to Find Word Count Using SQL
Firstly, let’s use SQL and MySQL. There are simple techniques you can use to find your word count. Although there is no built-in function in SQL server to give you a word count, you can use these steps to get it.
For example:
![]()
The above can be used if you have this table below:
| Name | Description |
| Steve Jobs | Steve Jobs, co-founder of Apple Inc. Born on February 24, 1955, and died on October 5, 2011. |
| Jeff Bezos | Jeff Bezos, founder, CEO, and President of Amazon. Born on January 12, 1964. |
| Bill Gates | Bill Gates, co-founder of Microsoft Corporation. Born on October 28, 1955. |
To count the number of words in a column, you can use commands to count the column length, their spaces, and extract the first from the second word. Try getting the word count for the second column. Take note that this is per column per row. There’s a different command if you want to get the total number of words for the whole column. Again, using the commands above, you can type it in this way:

As a result, you would see:
| Steve Jobs, co-founder of Apple Inc. Born on February 24, 1955, and died on October 5, 2011. | 17 |
| Jeff Bezos, founder, CEO, and President of Amazon. Born on January 12, 1964. | 13 |
| Bill Gates, co-founder of Microsoft Corporation. Born on October 28, 1955. | 11 |
Now, to do the same for the first column, you only have to replace the ‘description’ with ‘name’. See the command below:

As a result, you would see:
| Steve Jobs | 2 |
| Jeff Bezos | 2 |
| Bill Gates | 2 |
You can also count the total number of words in a column using the query above and modifying a few commands. Consequently, you would have to use the sum function. Do the second column again. You can type the command in this way:

As a result, you would see: 41
As you can see, it’s just a matter of playing around with the commands which means you can do the same for the first column by replacing again the ‘description’ with ‘name’.
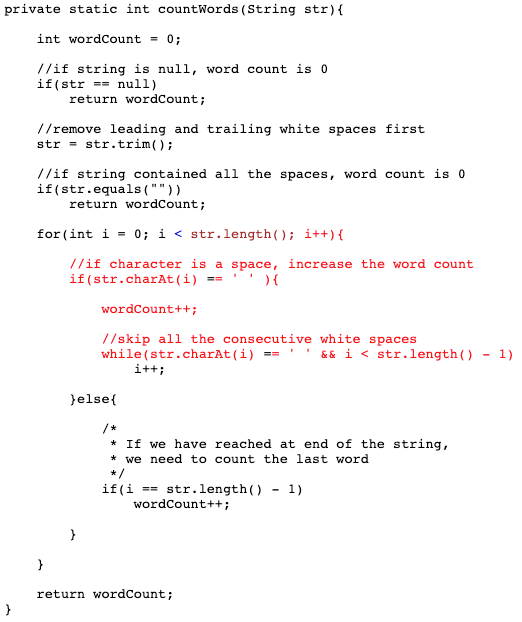
How to Find Word Count Using Java
Secondly, let’s see how we can do it in Java. Counting the number of words in a string using Java may look a bit more complicated. You can use something called a countWords method to do it. This is using the example:
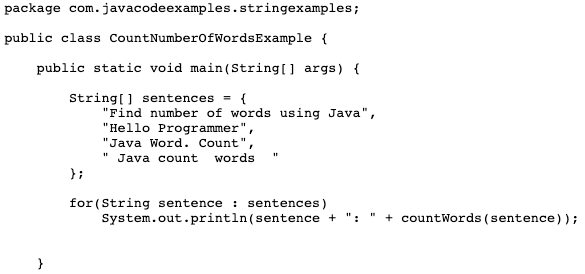
See the command below to count the words using Java.
As a result, you would see:
Find number of words using Java: 6
Hello Programmer: 2
Java Word. Count: 3
Java count words : 3
Use A Word Counter Tool Instead
As you can see, using programming languages such as Java and SQL to find your word count can be tedious. Instead of writing a program, you can use our readily available word count tool and character count tool. How do these two work? It’s really simple. The methods will be discussed below.
Using Word Counter Tool and Its Features
Simply go to the Word Count Tool site. On the Home Page, you will immediately see the Word Counter. Copy your text and paste it into the action box on the site. You don’t need to do anything else. Above the box, you will immediately see the Word Count, Character Count (with space), and Character Count (without space).
In addition, you will also see the Sentence Count and Paragraph Count. These are extra features that you won’t usually see in free word counter tools. Aside from that, you will also see below your Flesch Reading Score as well as your Reading Time. What do those two mean?
Flesch Reading Score
This is a tool that calculates the approximate reading level of any written work in English. It calculates the length of your sentences and the length of words within your sentences. Consequently, this tool determines the readability of your written content. It means it calculates how easily readable your written work is. If you get a low Flesch Reading Score, then it means that your written content is not easy to understand so you may need to modify some words or shorten some of your sentences. Ideally, you should get a score of 84 and above. Anything lower than that means that you need to improve on your content.
The Word Counter Tool readily analyzes your Flesch Reading Score. This is a feature that you don’t usually get in other similar online word counters. Hence, you will see your score immediately and for free!
Reading Time
This is simply the approximate time it will take readers to finish reading your content. It could be 2 minutes, 5 minutes, or longer. This gives you an idea of how much time your readers will spend reading your written work.
Using the Character Counter Tool and Its Features
While it may look similar, the Character Counter Tool on this site offers extra features that will help when you’re writing content for social media. Aside from the features already given in the Word Counter Tool such as Character Count (with space), and Character Count (without space), you will also see if the content or sentence you wrote is optimized for a specific social media platform. To use it, click on the Character Counter option on the menu above. See how its features work below.
Twitter Character Count
For example, let us use a sentence from above: “This is simply the approximate time it will take readers to finish reading your content.”
If you input the above sentence on the box, you will see that its Twitter Character Count is 192/280. A word of caution – this can be confusing so let’s clarify it! The number 192 is not the actual character count of your tweet. In fact, if you look again on the first box – Character Count (with space), it would say that the character count is only 89. The number 192 represents the number of characters left that you can use to publish a tweet. To simplify it even more, it means that you can add 192 more characters and your tweet will still be good.
The score 192/280 for Twitter is good! It means that the sentence or content is optimized for Twitter; you did not exceed the character limit that Twitter has imposed on its users. Your tweet will be read easily and will be published. If you exceed the 280 character count, Twitter will not publish your tweet and you will have to shorten it.
Instagram Character Count
The same is true for Instagram. Let’s use the same sentence, “This is simply the approximate time it will take readers to finish reading your content”. You will see that its Instagram Character Count is 62/150. As a result, you can add 62 more characters for your sentence to be optimized for Instagram. Do not confuse this with the actual character limit on Instagram, which is 2,200 characters. But why does the Character Counter Tool only put 150? This is because it is the ideal character count for your Instagram captions. It means that users will be more likely to engage with your post if you do not exceed 150 characters. It will force you to write compelling Instagram captions!
Facebook Character Count
Lastly, looking at Facebook, you may be alarmed why it is only set to 80. If you use Facebook often and have tried posting longer content, you will know that 80 characters are not the limit. You can make a Facebook post with as long as 63,206 characters! So, why 80? You should keep your Facebook captions short and sweet. So, posts with 80 character length hit the spot.
Using a Word Counter Tool with these advanced features will make it easier for you to enhance your written content. No need to use programming software to get your word count and character count!